review · sewing

{ SIMPLICITY } Star Sewist Blogger Challenge

On a total whim, I decided to take part in the Simplicity Star Sewist Challenge because lets face it, who wouldn’t like to win a years supply of patterns amiright ?!? So I chose to go with the dressmaking pattern, New Look 6145, because I like dresses & I knew dressing my baby bump would be easier adjusting this pattern to maternity rather than the other two patterns on offer. NL615_side3 Out came a beautiful piece of navy linen which I accented with some navy & white Shweshwe fabric I purchased while on holiday at home in January. The two pair really well I think. I sized up in general to allow for my pregnancy measurements as well as a little extra for ease. At first I was just going to use the shweshwe for the sleeves & inner facing but then decided rather than make my side seam godet inserts in linen, to make these in shweshwe too. I wasnt entirely sold on the contrast so I cut one of each, basted them both in & decided almost instantly on going with the shweshwe contrast as soon as I saw the dress semi-fitted. In all honesty, the inserts dont work 100% because I didnt trim off the angle required on the side seams. I left them as they should be because I really want to remove the shweshwe panels once Im able to wear the dress post-pregnancy. The inserts really just give me the added space for the baby bump & ass. NL6145_side 
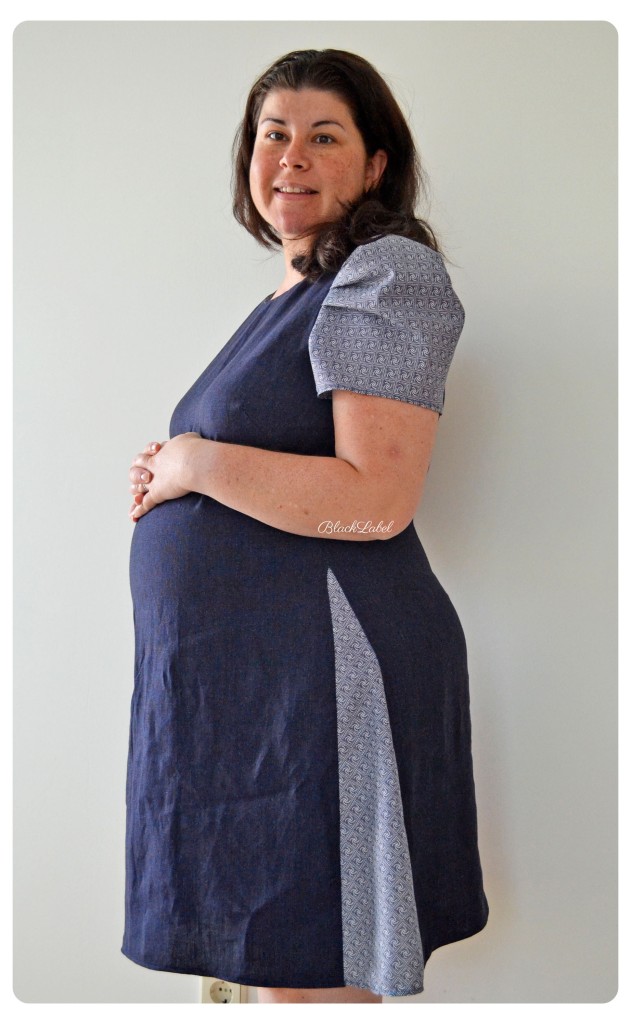
Overall, it was an easy sew & I { ADORE } the pleated sleeves…but then again, Im gaga over pleated anything! NL6145_front Thank you to Simplicity for offering the challenge & for the free pattern. I’ll certainly be making more of these shift dresses in the future. Also, good luck to all the sewcialists that have entered the competition. Cant wait to see who wins.

This will probably be my last sew for myself until after baby arrives. Im finding the bump so hard to gauge on size since Im in the final weeks & this Noodle is growing like crazy. Ive also hit the exhausted & rather uncomfortable stage so sitting for hours in front of my sewing machine is proving a little challenging. Ive gained 10kgs until now & Im feeling every.single.gram I tell ya. Ive had a relatively uneventful pregnancy to be honest with very few issues but these final few weeks things have definitely amped up. Dont get me wrong, Im loving being preggy & I couldn’t be more grateful for what is about to change our lives forever but this third trimester is tough on your body & your mind. Anyway, hope you’ve enjoyed my little me-made. Till soon. Ange x

pattern review · sewing

{ New Look 6254 } The non-maternity, maternity top…

Ive not wanted to turn this blog into a maternity/pregnancy blog by any means but the fact is Im expecting & since I sew mostly for myself, its natural that Id hit a stage whereby my life would be consumed with baby stuff, baby bump & dealing with dressing it. So feel free to skip these maternity frock posts if you have no interest – I dont mind 🙂

This New Look pattern has been in my pattern stash since 2004, not because I was hoping to be pregnant by then { NOOOO }. I bought it because it looked cute. Its not a maternity pattern BTW !!! After making it way back then & realising it made me look extremely pregnant, I decided to hang on to it for that day Id need it. Well folks, that day came – about 2 weeks ago. Im only due in July so its going to heat up pretty soon & then there’s the postnatal period which still requires a little bit of maternity wear so I decided to give this a go. NL6254 I used a polyester from my stash, probably also purchased around 2004 believe it or not. I was never overly fond of the fabric so I figured if the top didnt work for me, it would be no great loss. Turns out, I really like the fabric now that its made up.  It pairs well with both white & blue which will be perfect for Summer. I lined the bodice with a cream cotton to keep things stable. There should have been more gathers under the bust however on fitting, I realised it was a little too snug gathered right up so I let them out a little to allow for some extra room for the growing bewbs. Its still a little snug so Im hoping these milkies dont grow too much more. NL6254_side On the up side, there is plenty room on the lower front for the expanding baby bump. The sides have splits to a decent height allowing for extra swish which is nice. NL6254_side2Overall, its a quick easy sew & a top suitable for maternity, although it wouldnt work as a nursing top unfortunately. Now, all I need is the snow to move on out so the sun can come out. Roll on Summer. x

pattern review · sewing

{ NEW LOOK 6248 } The quick linen skirt…

It was the weekend before the Monday we were leaving to go on holiday….so what did I do….well, I whipped up a last minute skirt for the holidays didnt I?!? Dont you?

Good thing this tried ‘n tested pattern is a breeze.

Might I also add this was { LAST } year Summer. Whoops!NL6248

I used some of the 100% white linen I had left over from the shirt-dress. Love the fabric. It may crease like no-ones business but its crispness is such a pleasure in the heat.

I made view E without the ruffles, which admittedly woulda looked really cool but I didnt have the time to ruffle about in honesty. 8 panels sewn together, each seam topstitched with a 4,5 length on my Sapphy, in go the facings & the zip, hem & she’s done.

Easy as that. N6248

Just thought Id share if any of you are considering this little skirt for the coming summer.

Till soon my dears xx

PS – Ive paired the skirt above with the BurdaStyle wrap top I made yonks ago incase you interested in that pattern.

pattern review · sewing

{ NEW LOOK 6003 } The tame animal skirt…

I was instantly all over this pattern because of the lovely variations of skirts offered. Although it shows a couple peplum options together with a standard basic pencil skirt, you could absolutely go mad with alterations to custom this skirt to anything you need it to be. I love skirts with back vents so this pattern is a winner for many reasons.

I chose View E not because I wanted to be boring but because once I had selected the fabric I knew adding a peplum would just add too much “wild” & the fabric was wild enough. NewLook_6003_skirt_front

{ DESCRIPTION } New Look 6003, pencil skirt in various lengths, with back vent and various peplum options.

{ FABRIC USED } The fabric is a stretch cotton, think stretch denim & your’e heading in the right direction.  The fabric was a printed panel. I cut the front from the upper part and the back from the lower part of the panel. I like how the patterns are so different but the colouring is the same and doesn’t look mis-matched….or does it?

{ SIZING } I cut my usual size however it was a little too big. I removed at least an inch off both side seams and little more than an inch over the hips. Once I got the waist & hips fitted, the length of View E just looked rather frumpy so I chopped off 4 inches and then I pegged in the hem & used my french curve to shape the sides so the skirt gives a bit more of an hourglass shape than a straight pencil skirt. Due to the stretchiness of the fabric, it works really well however I dont think I  would do this if the fabric were non-stretch.

{ INSTRUCTIONS } I did not use the instructions. This is a basic pencil skirt, you really cant go wrong.

{ CHANGES / ALTERATIONS } Instead of installing a normal zip or an invisible one, I installed an exposed zip! { WHAT ?? } Oh yeah, an exposed zip! I used the Gretchen Hirsch tutorial  which explains how to do this & I think it looks pretty cool. I chose a white zip with silver metal teeth & its by no means a perfect installation but its pretty good for a first attempt. Word of warning & if you’ve already tried this method, you will know already – but installing an exposed zip challenges everything you already know about installing a zip. They go in so differently to a regular zip that you almost start to question your sanity. Rest assured though, it looks great & its so easy to do that once I was done I started seriously contemplating why every zip is not installed this way…it makes life much easier.

More changes….Hmmmm…oh yeah. Once I sewed on the waistband, instead of hand stitching the facing under, I sewed the facing on normally with raw edges & finished the whole lot with bias tape to hide the raw edging and give a better finish. I could do that all by machine which means I avoided the handstitching all together. { BONUS } NewLook_6003_skirt_bindings

{ LEVEL OF DIFFICULTY } * For me this was an easy sew & I would recommend it to a beginner, perhaps a slightly experienced beginner.

{ TIME } This skirt took me around 4-5 hours.NewLook_6003_skirt_side

{ SUM IT UP }  This skirt was definitely an experiment & for various reasons. I had wanted to experiment with fabric pattern ie. the animal print on one side and the grass etc on the other. I also wanted to try an exposed zip somewhere along the line because I had never tried before….but I didnt start this project with those plans in mind, it kinda just fell together as things evolved.

Overall, I really like the results and I like patterns that are simple and therefore allow for maximum self expression through additions and changes to make them unique. This New Look 6003 certainly fits that bill so its fast become one of my favourite patterns.

Ok, til next time x

pattern review · review · sewing

{ NEW LOOK 6150 } Protea lovin’…

Ive sewn New Look 6150 before, rememberNewLook_6150_front

The reason I sewed it again is because I have a little crush…it fits so well { PLUS } I had this white knit lurkin’ in my stash for about 3 years so I figured Id better dig in while its still white. True, Ive had fabrics lurk in my stash much longer than 3 years but this white was looking particularly needy & with autumn knockin’ who doesnt need a plain white tee-type with some extra spunk?!

It was View E, again…you know, the one with the puffy sleeves & plain crew neck. Remembering the little bagginess I had with the first attempt at this tee, I cut the entire pattern one size smaller than last time. I also cut the back piece on the fold. Not only does it all fit better but I love that the back has no seam down the middle – so unnecessary IMO. NewLook_6150_white1

I tackled the sleeve elastic without measuring anything prior this time. In other words, I took the long piece of elastic & just sewed it in, pulling the elastic as I went along…It gave me more control of the elastic & it meant I could use as much or as little as needed until I got the poofiness I was looking for. I simply snipped off when I was done. Far easier than using the elastic guide length included in the pattern & then not having enough to grip as you near the end.

And my twin needle came in excellent use again!

I had some left over fabric at the end so I thought maybe  a flower or something  could be pinned to the tee to give it some detail…as if the poofy sleeves aren’t enough. I played a little & came up with the protea so I drew it out, cut & started to sew randomly. I stitched it straight onto the tee, without any backing or interfacing….straight on. I wanted it to stay soft & take the shape of the tee rather than feel stiff & badge-like. I was quite impressed with the end result. What do you think of my fabric protea ? NewLook_6150_protea

I doubt I will ever grow bored of this pattern. Its one of those that hit the favourite list at first sew. Its easy & it doesnt munch up stacks of fabric so I may just head to the fabric store next week & grab a navy & black or a red to make another one or two or three. I have to go into the fabric store anyway because remember the Vogue 8827  I mentioned was on the cutting table? …yeah well, I dont have enough fabric…but I am determined to make it in the berry colour jersey.

 Well my friends, Monday my german course kicks off…can you hear the enthusiasm?! Im expecting next week to be one big headache, literally. I know Im not going to drink or eat enough while Im in class & just the sheer shock of having to do german all day, every day is going to be  headache inducing. Perhaps my sewing will come to the rescue on the afternoons I have off – lets see.

Whatever your’e up to this weekend, stay safe xx

pattern review · sewing

{ NEW LOOK 6242 } Cloudy day dress…

Ive sewn NL 6242 before, however only the top version so I decided to try the dress { VIEW A } this time. NewLook6242_front1

I had remembered the pattern was a great success so I pulled out the cotton I purchased from Alfatex a few months back. I loved the tie-dye type effect which looks like a cloudy, overcast sky. I didnt expect the flocked pattern so that was an added bonus once it arrived – hazards of shopping fabric online. Luckily in this case it was a good hazard, or is there such a thing?!

I chose a bright orange piping (which was already in my stash) for the contrast along the undersides of the bust & midriff & continued the piping through the back. I had a little trouble matching the piping at the seams on both sides initially. The zipless side I managed to fix, the zipped side I figured the difference was so minute I wouldnt bugger with a good enough thing. For the zip, a white invisible did the trick however I used a slightly shorter one than specified. NewLook6242_leftside

I also remembered to increase the length of the halter ties but I still think they could be even longer…so next time….

I cut the pattern to my size and although it fitted well, the skirt was a tad tight over the hips at first so I let out the seams slightly just for a little extra space – perfect.  I noticed some bagginess at the back waist area after some wear. With regular straps this wouldnt have been a problem, but the nature of a halter neck means the bodice is pulling up on the front so naturally it will shift slightly on the back. I was going to remove the small bit of bagginess but instead I decided to try this magic “Sockenbremse” ( Socken = socks, bremse = brakes) instead ie. it turns your bare socks from neck breaking enablers into slip-proof pad-around-the-housers! I ran a small thin line of this over the top edge of the back & et voila…no more shifting back = no more bagginess! The latex comes in a variety of handy colours, can be used on a variety of fabrics but it does need around 10 hours to dry. Its also washable to 40 degrees which is perfect since I would never wash this dress any hotter. NewLook6242_rightside

I used my 10mm hemmer gadget for hemming which I had much better results with this time round than the last time I used it. I think this hemming gadget works best with cottons though so I still feel like its a hunk-a-junk in terms of it being marketed as a “foot”. NewLook6242_back

The pattern is relatively easy to construct and although I wouldnt go so far as to say its great for beginners, I do think an advanced beginner could tackle this with relative ease. NewLook6242_closeup_piping

Thats all for today folks, till next time x

{ Related Posts }

pattern review · sewing

{ FRUSTRATION FUNDAY } Shifting to a wadder…

Ive been wondering why its the simple patterns that have me in a fit sometimes….Why is it that I feel Im so competent in details like the pea coat or my wildest dreams dress but when it comes to some piss-willy basic shift dress, I lose all ability to make it work. Is it me or the freakin’ pattern ?

Not so long ago I was praising New Look patterns. { HA } Big fat HA. I failed to recall I had in fact tried to sew the 6862 shift dress before – in the same fabric too! I mean honestly, WTF was I thinking?! Perhaps I thought because I had tried this pattern back in 2005 & assuming my skill had improved since then (which it absolutely has), why was the second attempt as nasty as the first?  It just looks like a sack!!NewLook_6862_front1

The fabric is so sweet with the borders & the beautiful soft colours. The print is so tight that you can hardly see the seams making it so perfect for this little shift. But Im just not loving it at all & I can already hear the choir singing the muslin song…!!!? But quiet down…if sewing is a religion then no judging please 🙂

My issues with this pattern stem mostly from the fact that it is indeed not a pattern for women with curves. If you have booty, you WILL be screwed by this pattern because without darts to the “skirt” you will have all sorts of nasty everything going on around the middle parts. Which brings me to the suggestion that more pattern companies jump the bandwagon suggesting ,as Vogue calls it “Figure Flattery”, ie. the inverted triangle, the triangle, the rectangle & the hourglass. { GENIUS }. All of those symbols are pretty self explanatory!!

Anyway, Ive started tackling the middles with darts giving the sack some shape & pinned out the top of the border to make the lines cleaner & its beginning to summon up some affection, if only somewhat.

NewLook_6862_front2NewLook_6862_side

I fear that it dont matter what I do to this dress, I will probably never feel comfortable in it so Im playing with the idea of pulling it all apart & using the “scraps” for something else along the line…somewhere!

Frustration doesnt even begin to explain, but what really hurts is the fact that looking at the pattern, it should be an easy sew.

I’ll be letting this stew for a few days…somethings gotta give!!

pattern review · sewing

{ NEW LOOK 6150 } Autumn ruching…

Ive been doing a fair bit of jersey/knit sewing recently & this top caught my eye when I saw Annika’s version in a stripe. Before my pattern even arrived, I had selected fabric from my stash. I went for the floral matte jersey I had left over from the Butterick 4788 dress I made a few years ago. Can I just say until now Ive always loved seeing twin needle work & Ive always had a twin needle (three in fact) but never used them. I wasnt scared of trying it, I was just lazy to try it I guess. While I was sewing the DKNY LBD, I made a promise that I would make use of the twin needle whenever I sewed my next jersey/knit. Boy am I glad I did. How easy does the twin needle make sewing knits???  { INSANELY EASY }NewLook_6150_front Anyway, I used the twin needle for the first time on this top & its { LOVE AT FIRST STITCH }. I cant get enough. It was in no way perfect but DAMN it looks sooo much better than a single stitch. Now I just want to sew everything with a twin needle. I need to tweek my tension because I think its making too much of a welt between the 2 lines of stitching. The curse of the computerised machines means Im battling to figure out how to adjust my bobbin tension but I will conquer. Ok, moving along…

{ DESCRIPTION }  New Look 6150 knit top with various options. I sewed View E which is a basic crew neck with ruched sleeve detail

{ FABRIC USED } A floral matte jersey

{ SIZING } For the most part pretty spot on. I do have some loose fabric around the upper arms but I will get to that…

{ INSTRUCTIONS } For the view that I made, instructions were not necessary but I browsed them over anyway.

{ CHANGES / ALTERATIONS } Initially I sewed in the exact length elastic they advised via the elastic guide however I didnt think it gave me sufficient ruching so I removed the elastic, cut it slightly shorter & stretched it more to give a nicer, fuller ruching. I still would like the upper sleeve to be poofier but hey ho, I know this is not the last one Im going to make so I will make the adjustment on the next. At the underside of my sleeves I have some baggy-ness so next time I know to cut the whole sleeve slightly smaller. I did not use binding around the neck as advised, I ironed on some bias tape & then turned it over & stitched it down using the twin needle. Again, its not perfect but for a first timer using the twinny, I think its good! Also, Im not entirely sure this top needs a seam down the back to be honest. I think the next attempt will have no seam & maybe a size smaller…lets see.

{ LEVEL OF DIFFICULTY } ** Easy, however anything with sleeves automatically gets another *.

{ TIME } A couple of hours – I didnt really check on this one.

{ SUM IT UP } Such a basic T-shirt pattern but the ruched sleeves give it a little kick in the ass & I like that. To make this top fit the last of the fabric I really had to do some genius cutting which had me scratching my head for a bit but it worked & Im so glad I took the time to find a solution. I reckon I can wear this summer & winter but I am looking forward to layering this with scarves & light jackets for autumn. NewLook_6150_back Sewing has been a little slow of late because we are having an awesome summer. When I sit & sew I feel bad because the sun is shining & I should be outdoors enjoying but then when I sit in the sun & think about sewing I feel torn – first world pains huh !!   { PFFFT }NewLook_6150_sleeve

pattern review · sewing

{ COMPLETED } Fiesta Denim shorts…

NewLook6100_pocket_trimI called these the Fiesta shorts because they make me { SOOOOO } incredibly happy…& I think it has more to do with the peek-a-boo colour than anything else.

While I was sewing these shorts, I had an epiphany – Im pretty darn pleased with every single New Look pattern that I have ever used. I find their fit so spot on therefore minimizing fitting issues & baggy this or gaping that. I just love how true & tested these patterns seem to be. Sure, Ive sewn one or two that Ive had choice words for (& in hindsight the problems have probably been me making stupid decisions about fabric choice or short cuts etc), but in the big scheme of things, I seem to be far more pleased with this pattern company than some of the other big names.NewLook6100_front

The weather has been disappointing & rather chilly the past couple of days so I will have to wait for a good sunny day to wear these & photograph them in action. Will update pics when I do so. The Fiesta shorts did not disappoint….so here are the deets :

{ DESCRIPTION }  New Look 6100 from the WORKROOM / Project Runway collection. 2 styles of shorts – one straight leg with cuffs & one flared leg, both with waistbands, pockets & optional waist tie.NL6100

{ FABRIC USED } I blogged about my fabric choice but incase you missed that, I used a light-ish weight denim which I pre-washed before cutting. The denim has a geometric pattern which is not printed on, its actually a burnout…or at least thats what I think its called. For the pocket facings & waist facings, I used a burnt orange taffeta I had in my off-cuts stash.NewLook6100_facing_fabric

{ SIZING } I cut my normal size & had no problems.

{ INSTRUCTIONS } I glossed over but did not refer to them too often. These shorts are pretty basic.

{ CHANGES } I omitted the waist tie so therefore by default omitted the carriers. I also wanted some colour so instead of using the denim for the pockets facings & waist facings, I used the burnt orange taffeta which worked really well & I love the peek-a-boo pop of colour. I had mentioned that I was thinking about using a white cotton embroidery anglaise or something similar for the edges but once I saw the indigo blue & burnt orange together, it just seemed like a match made in heaven. Instead of machine stitching the waist facing down after folding back, I hand stitched which took forever but I prefer it.

I also inserted my zip on the right side. Just because! I did not have a navy zip or an invisible zip so I improvised with a regular black zip. Instead of fussing with making a lapped zip cover to accommodate the regular zip, I simply stitched the zip in the wrong way. Yes it means the zip opens from the inside but who cares. Its in, its invisible & it works. Ok, its not { 100% } invisible  but its not freakin’ bad.

Instead of machine stitching the leg facings (ie. the turn-ups) to the underside, I decided to hand stitch them to the understand thereby allowing me the flexibility to wear the shorts without turning up the bottoms if I wanted to without having the stitch lines showing…{ AH HUH }.

{ LEVEL OF DIFFICULTY } * Easy peasy!

{ TIME } I sewed this together in a couple of hours including screwing around with my trim choice. The handstitching added extra time to my clock but this was a personal preference that does not need to be done.

{ SUM IT UP } I really love these. They are comfie & depending on what fabric you use, they can be super casual or quite dressy. I can imagine these in a polka dot, I can see them in a stripe, the lovely Erica B made an awesome denim pair with stars, but sew them up in a black with gold trim perhaps & you have a chic pair of shorts to pair with a blazer. Im pretty sure this denim pair will not be my last & I love that the pockets open up so many opportunities for creativity – piping, lace trim, ribbon, ric-rac, funky bindings, fun fabrics – the possibilities are endless.

Perhaps its my choice in fabric but without the turn-ups they can look a little pajama-bottom-ish…it may also be because I left off the waist tie. But paired with a nice white cotton frilly tee-shirt, Im thinking PJ-ish or not, they are going to get lots of wear.

Highly recommended ! NewLook6100_pocket_trim1NewLook6100_inner

{ BTW } that nail colour Im wearing that happens to match the shorts so well is Catrice Squeeze Me. Its a really dark charcoal grey with a hint of blue but it has these beautiful gold shimmer undertones in natural light. Im finding it the perfect alternative to my usual black. Catrice_SqueezeMe

sewing

{ ON THE CUTTING TABLE } Denim shorts…

I mentioned many weeks back that I was wanting to make these New Look 6100 shorts. I was not settled on the fabric choice so I decided to “sit” on it until the fabric choice was clear.

A week or so ago I had to pop into the fabric store for some lining & zips…lo & behold there sat the most amazing denim. So unusual, I just had to have a piece. There was not much fabric left on the bolt but it was sufficient to have the piece I needed. The salesman pointed out that there would be less than a metre left on the bolt after my cut so he offered the remainder to me at a very reduced price – I couldn’t say no. { AND } I promise I did not plan that *evil grin*

Denim_NL6100

Slowly becoming view A  & Im so excited to see these finished. I have thought about playing with a trim, perhaps a cotton embroidery anglaise peeking out the bottom or some cotton lace…maybe a little piping ??!! Lets see.

Last week I had asked about your experience (if any) with sewing & weight loss etc. The general consensus was to stitch things with knits etc to allow for the change in sizes which I have been doing. I considered those thoughts with this project but ended up deciding I dont give a damn…I want shorts. end.of.story!! 🙂